Setup Dynamics 365 Business Central Integration
Explore our API integration with Dynamics 365 Business Central.
Before you can access data from Dynamics 365 Business Central sales orders you'll need to:
- Register and configure your Business Central application and then generate your client ID
- Generate your client secret
- Update access permissions
- Add your application values to the Dock2Dock Portal
Register your application with Microsoft Azure
Register your Business Central application on the Microsoft Azure portal.
- Sign in to the Microsoft Azure portal.
- If you already have a Dynamics 365 Business Central account, use those account details to sign in.
- If your organization is using Microsoft Entra ID to control access to Dynamics 365 Business Central, ask your Azure administrator to add your account to the correct group.
- After you've signed in, select Microsoft Entra ID on the home page or left menu.
Details of the tenant that your account is connected to are displayed.
- Select Manage > App registrations in the left menu, then click New registration.
4.Enter the following details:
- Name: Enter a short name for your application. We recommend you put
Dock2Dock Dynamics 365 Integration.
-
Supported account types: Select Accounts in this organizational directory only (Single tenant). This allows Dock2Dock to access data in Dynamics 365 Business Central.
-
Select Register
Azure registers your application details and generates your application client ID as shown the screenshot below. You'll need this later, so either copy the details now or keep the page open in a separate browser tab.

Generate and retrieve your client secret
In the Azure Portal:
-
Select Manage > Certificates & secrets in the left menu.
-
Under Client secrets, click New client secret.
-
In the Add a client secret dialog, update the following information:
- Description: Enter a short description for your client secret to make it easier to find.
- Expires: Select the most appropriate option that complies with your company's security policy.
- Click Add.
Your client secret is generated and displayed at the bottom of the page.
⚠️ The Secret Value won't be displayed again in full, so you must copy the value now.
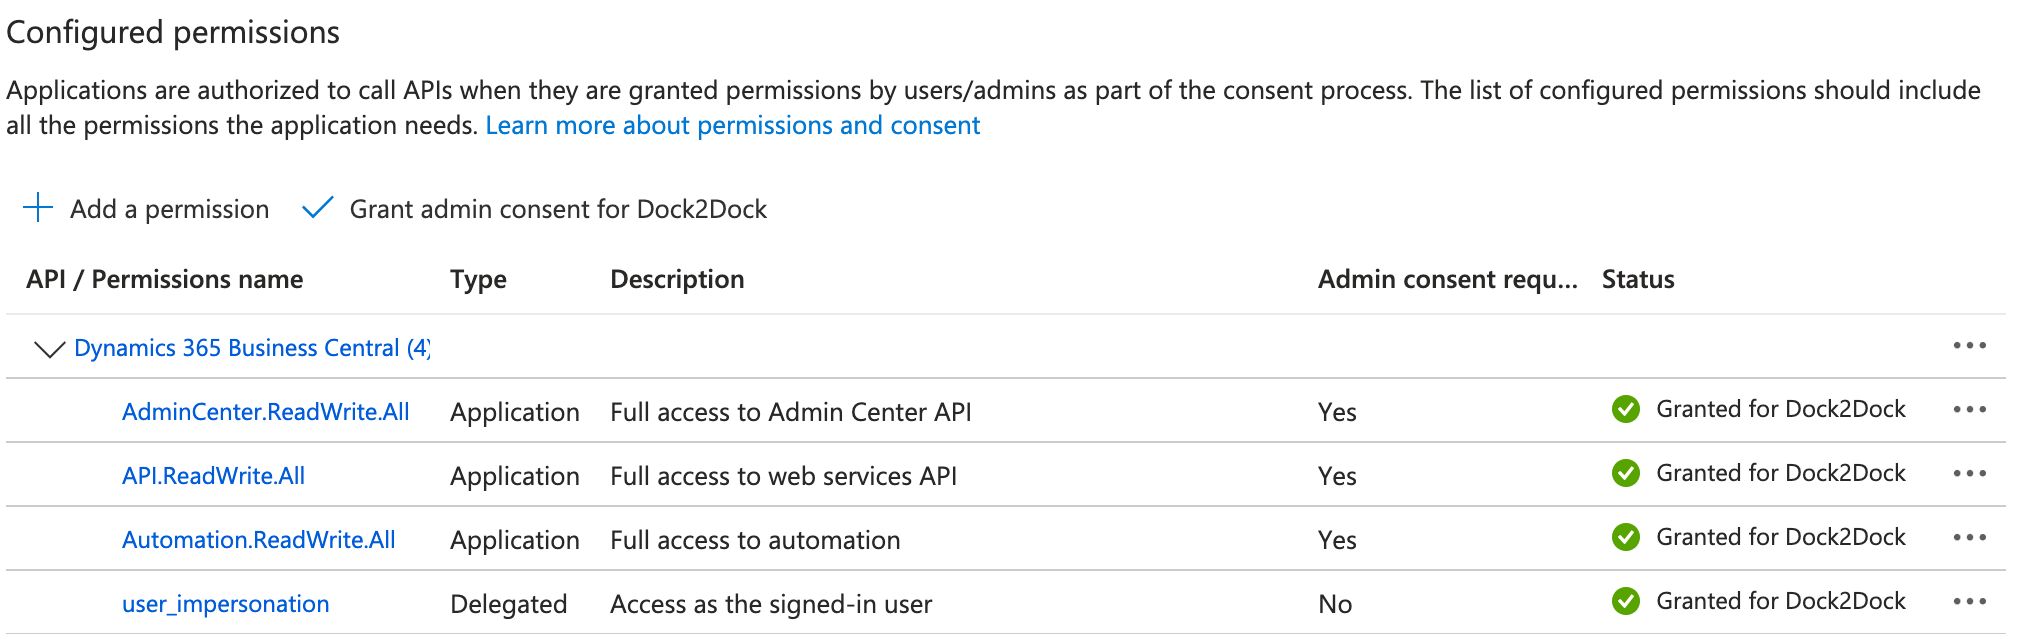
Update access permissions
Now update the access permissions for your application. These control the data that your app can access in Business Central.
-
Select API permissions in the left menu.
-
Under Configured permissions, click Add a permission.
-
In the Request API permissions pane, scroll down and select Dynamics 365 Business Central.
-
Select Application & Delegated permissions and also select the listed permissions:
- AdminCenter.ReadWrite.All
- API.ReadWrite.All
- Automation.ReadWrite.All
- user_impersonation
-
Click Add permissions.
-
Above the listed permissions, select Grant admin consent for Default Directory and then select Yes to confirm your change. This option might not be available for all subscription types.
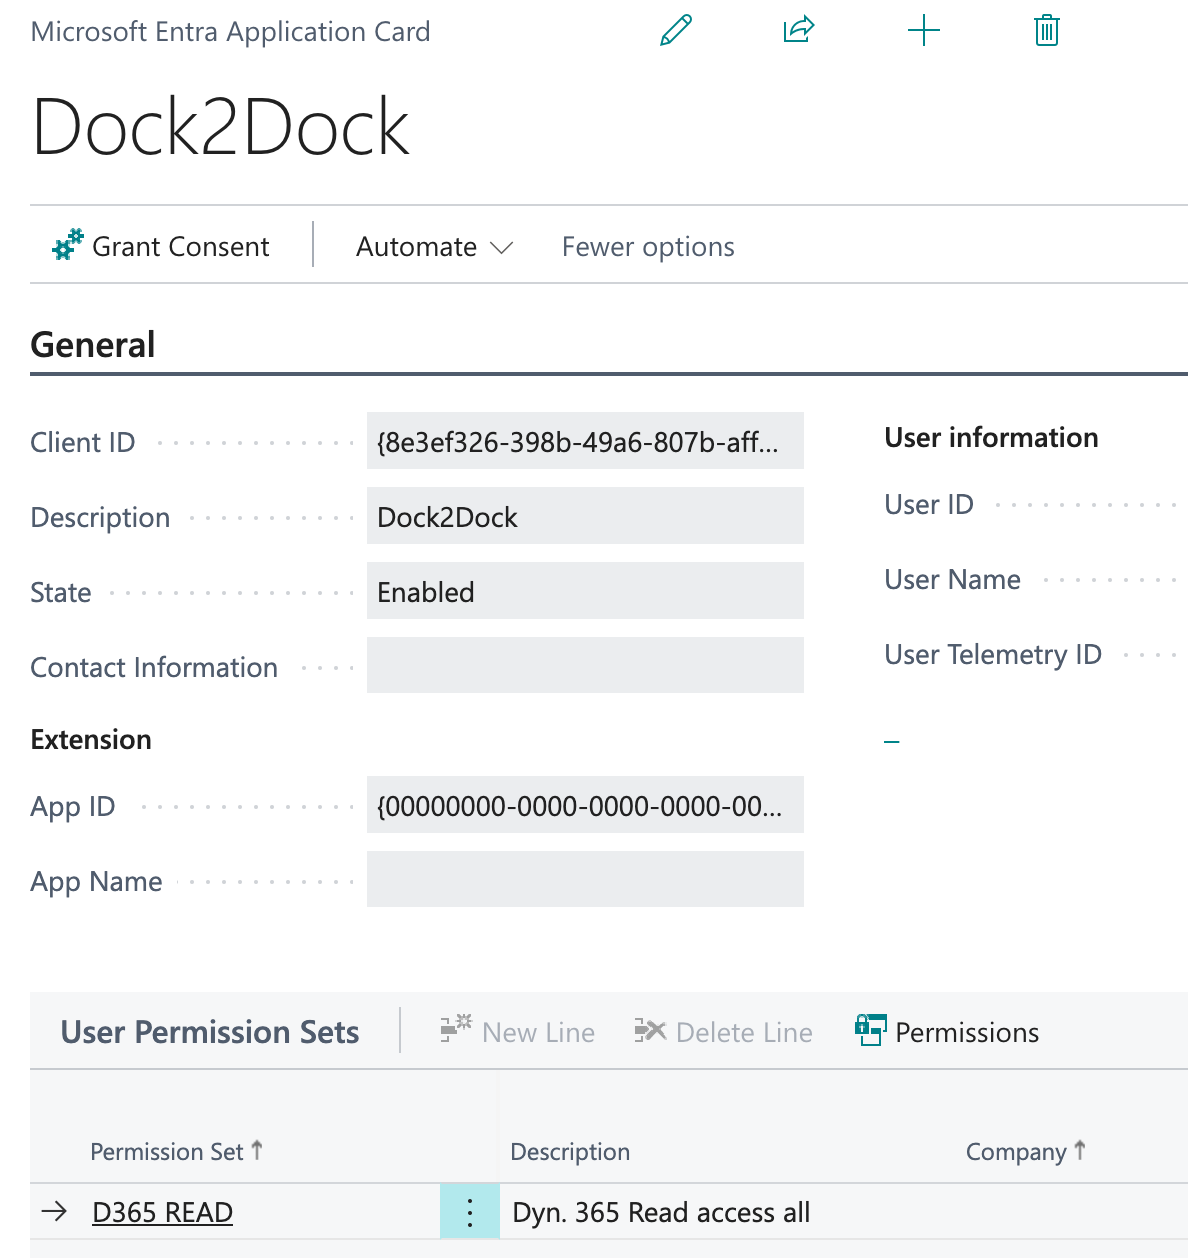
Add Microsoft Entra ID application in Dynamics 365 Business Central Portal
-
Login to Dynamics 365 Business Central Portal -> Click search icon -> Search Microsoft Entra Applications -> New
-
Paste the Microsoft Entra Application
ClientIDinto the Client Id field and set state as Enabled
-
To enable the integration, your application requires
D365 READaccess to Dynamics 365 Business Central, and WRITE access to the Sales Header and Sales Line tables. While granting D365 FULL ACCESS is possible, use this option with caution—especially in production environments. For best security practices, we recommend assigning only the exact permissions needed for your integration to function: READ access to all required tables and WRITE access only to the Sales Header and Sales Line tables. -
In the Dynamics 365 Business Central Portal click Settings > Admin Center. Select the new application client and click Authorize Microsoft Entra App
Your Dynamics 365 Business Central application setup is complete.
Dock2Dock portal
Add your App's secure keys
-
In the Dock2Dock Portal, go to the integrations page.
-
Locate
Microsoft Dynamics 365and click Set up. -
Enter the values for
Client Id,Client SecretandTenant Idfrom the Azure Portal. -
Choose which Dynamics 365
EnvironmentandCompany Idyou would like to connect to -
Click Save. A confirmation message appears if the settings were saved successfully.
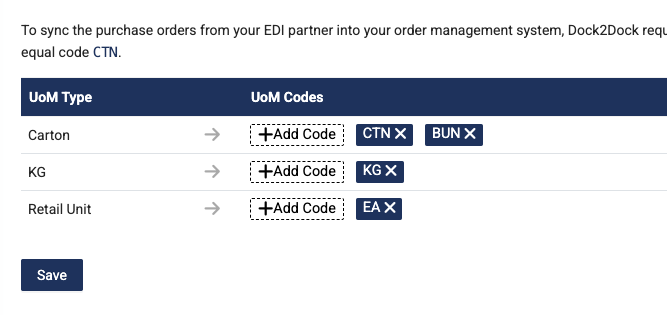
EDI setup
You'll need to map the Dock2Dock UOM type (e.g., Carton) to the corresponding Unit of Measure (UoM) code used in Business Central (e.g., CTN). This ensures Dock2Dock can accurately translate EDI purchase order line units to the correct UoM in Business Central.